Hey there, it has been a long time we wrote a pattern, we are back with this beautiful Granny Ripple Pattern just for you. This one is very easy same as other Granny Patterns, you can make bed sheets, bags, blankets, purses. 🙂 Possibilities are many, you just need an awesome imagination. So without much ado let us see what things we will need for this simple and gorgeous pattern. We will go step by step here.You might feel it is too long but this is written so that you crochet along reading each step 🙂
Things we will need to make our Granny Ripple Pattern
- Crochet Hook Size: 3.75 mm or more
- Yarn: Any 4 ply yarn (or any yarn suitable for the hook size)
Further, we will also require a pair of scissors and a yarn needle.
Abbreviations:
Ch: chain
SS: slip stitch
dc: Double Crochet
Sk: Skip
Also, before starting please remember that the length of your chained stitches does not determine the length of finished product. It will shrink because the pattern is such.
The pattern for the Granny Ripple Pattern will be as below:
Here we will start with chains of multiple of 18+1 so here we will do 18*3+1=55 chains in total
This means one set of 18 will make one ripple peak since we have taken 18 three times it will be 3 peaks.
Round 1:

Step 1: Skip 4 chains from the hook and make 3 DCs in the 5th chain.
Step 2: Sk 2 ch spaces and 3DCs in next chain.
Step 3: Again sk 2 ch and 3 DC in next chain
Step 4: Chain 3, 3DC in the same chain (this will create a little mountain like peak on our work)

Step 5: Sk 2 ch and 3DCs in next chain
Step 6: Again sk 2 ch and 3Dc in next space
Step 7: Sk 5 ch and 3Dcs in next space (This will create a valley like gap)
Step 8: sk 2 ch, 3DC in next(you will now be able to see how the pattern works and looks)

Step 9: sk 2 ch, 3DC in next chain
Step 10: ch 3 and 3DC in same chain (again a peak will be formed)
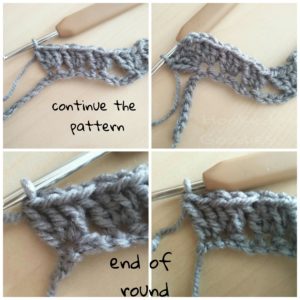
Repeat the above steps till you reach the last chain, according to the stitch counts you will get a total of 3 peaks and 2 valleys, and of course 2 (half) valleys on the sides
Step 11: at the end you will be left with one chain after a 3DC cluster, take 1DC in that chain
By this time your ripple granny will be on twisty and twirly, the pattern is yet to set itself, do not panic 🙂
So now you have the main foundation of this Granny Ripple Pattern
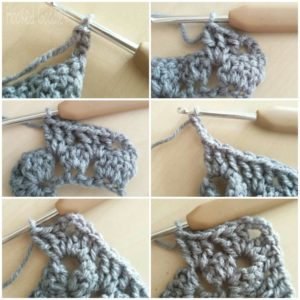
This completes our 1s row you can have a better picture if you look ate our photos, click them to see clearly.
Round 2:
Coming to the next round we will keep the same colour:

Step 1: Ch 3 and turn your work
Step 2: directly go to the gap between two 3DC clusters and make 3DCs in this gap
Step 3: In the next gap make 3DC cluster
Step 4: Now you will get a gap where you did 3 chains, here make 3DC—ch 3—3DC (because this will again create a peak)
Step 5: 3DC in next gap

Step 6: 3DC in next gap (after this you have now reached the alley part)
Step 7: skip the entire valley gap and crochet in the next gap
In the same manner, keep making 3DC clusters in gaps and 3 chains in the peaks, by now you will have an idea about how it is taking shape.So now you are ready to make beautiful blankets and afghans.
Step 8: after you do 3DC in the last gap make a DC in the 3rd turning chain of the 1st round (you will et and idea from the photo)
So go ahead and do the third round it is very easy, ignore the valley gap completely and do 3DC—ch 3—3DC in the peaks 🙂 You will definitely do well because by now you have an idea how the pattern goes.
For colour changes start a new colour as you normally would check our other posts for this
So now you have a Granny Ripple Pattern
By now you will understand the pattern, they are normal 3dc clusters but chain 3 spaces on the peaks only. You can also vary this combination by 2 chains or a single chain on the peaks. We have not tried it but it will give a different and more rounded peak.
Check our other collated free patterns as well 🙂
Hope we made it easy for you. Please feel free to send your trial pics of Granny Ripple Pattern on our Facebook page, because we always love to see more and more creative and colourful projects each day. Further, you can also check us out on Instagram where we put all our creations.
Please let us know if you were not able to follow this pattern due to some reason. If some part isn’t clear to you, feel free to reach out to us if you need a clear understanding on any of our articles.
We will be back with another pattern probably with a slight twist in our next article. Since we have just started we would like to know what all patterns you want to learn, please free to comment below 🙂
Want to try more Tutorials???
Also, use our In-house Crochet Tools when in doubt
Confused about your hook size?? Check it on our Crochet Hook Size Converter Tool
Do not know which yarn is what weight?? Check it on our Yarn Weights, Numbers and Names Tool
Want to Crochet something but Can’t find the pattern?? Check out our Random Crochet Pattern Generator
Like Our Crochet Posts???
For more such articles sign up today to be the first one to read them. We also have lots of crochet patterns where you get many free patterns of a particular thing under one umbrella. Also, we write simple beginner patterns with photo-tutorials.
Do you want to have any other lists of free patterns?? Do write to us for the same. You can visit us at our Facebook page and Instagram account where we share our crochet creations. You can also check out our Pinterest account. Also, do let us know if you like our articles, using any of the social media platforms.
Also, Do not forget to request the listicle articles you want. You can contact us on any of the social media platforms Facebook, Instagram, Pinterest & Twitter. Further, You can also contact us on through mail given in the Contact Us Tab of the website.
Note:- All patterns and photos belong to the Designers. We do not take credits for any of these. This post is not sponsored.
LOVE WHAT WE ARE DOING? SUPPORT OUR EFFORTS AND KEEP US ENERGIZED
 Buy us a Coffee

My mail address can you send patterns by mail. Please ill pay for them . Thank you an God Bless you .